

I have been dying to have a go at printing French style graphics and typography onto fabric for a while now, having been inspired by the graphics from The Graphics Fairy , Vintage Feedsacks, and by some of the lovely makes I have seen on some US blogs such as The Shabby Creek Cottage, and the projects section of The Graphics Fairy.
There appear to be numerous ways of achieving this and I aim to try a few of those. This Tutorial deals with using Inkjet Transfer Paper and an inkjet printer. NB: For those with a printer which uses toner, I have come across another method which I will be trying out soon, and if it works I will do a tutorial.
So the other day I had a go (my last two posts show some of the end results!), having already got myself prepared by buying some Iron-on Transfer Paper* (for light colours), and by browsing and downloading lots of gorgeous graphics from both The Graphics Fairy and Vintage Feedsacks.
*Note about buying Iron-on Transfer paper - I found the best value paper was on eBay and paid round about £7 for 20 sheets - there may be even better buys out there. WHSmiths charge £14 for 5 sheets!
Equipment
Iron on Transfer Paper (for white or light coloured fabrics)
Inkjet printer
Down loadable Graphics or other design images
Iron
Hard surface such as a wooden chopping board or kitchen table
Two teatowels or folded pillowcase (for the ironing stage)
Fabric (atleast 50% cotton content)
Method
1. Prepare the image
I used Word for this, and opened a new blank document then clicked on Insert, then Picture, then found the image I wanted by browsing My Pictures to where I had saved the images. I clicked on the image I wanted and clicked on insert.

I then re-sized the image to get the size I wanted by clicking on the image and dragging it using the arrows. If you want to you could copy the image to make best use of the paper (see below), depending on the size of image you want.
NOTE: If your image contains text, it is important to reverse the image to create a mirror image otherwise the text will come out wrong! ie. When you have reversed it, it will look wrong on screen and wrong when you print it, but once it is ironed on it will read correctly!
It is not so important if it is just a picture, although it will come out the opposite from what you see on the screen unless you mirror image it. See Cockerel example below.

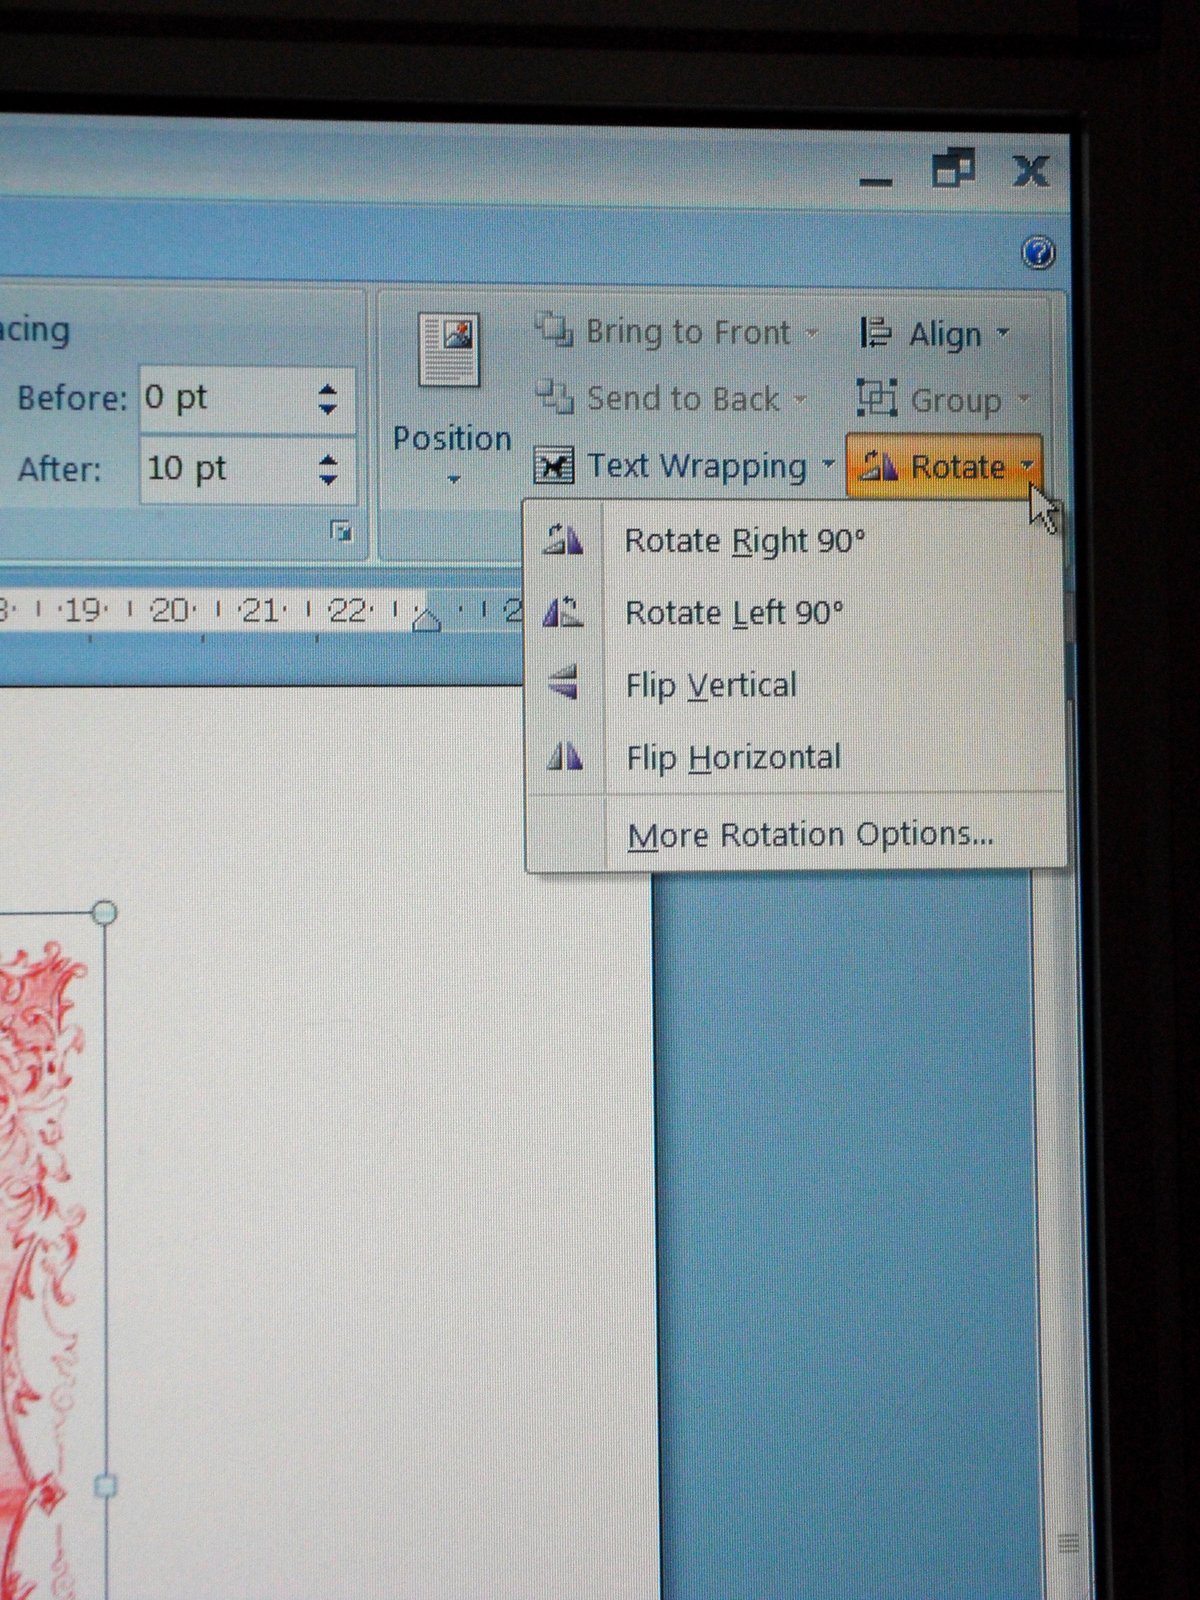
To create a mirror image in Word, go to Page Layout then at the right hand side of the screen find "Rotate" then click on "Flip Horizontal" to reverse the image. This way the text will come out correct when transferred onto your fabric (don't forget, it will look wrong on screen and when you print off the paper )
NB: I found it was best to add text to an image using something like Picasa or other photo editing software rather than in Word itself ( if using Word) , as I found that text boxes and word art would not "flip" when attached to the image - the image flipped but the words wouldnt! So for the book cover (see a previous post and the image later in this tutorial) I added text to my image in Picasa, then inserted the image into Word, then the whole lot "flipped" OK!
Now you are all set to do a test print on ordinary paper.
2. Print the Image onto Transfer paper
Do a test print on ordinary paper first to make sure the size etc is as you want it, and that all of the image will be printed, then once you are happy, set the Print options as per the Transfer paper instructions and according to your printer - mine said set to Transfer Mode or Plain Paper Best Quality, but I used Speciality Paper setting (as I didnt have transfer mode) and it worked fine.

NB: Make sure you insert the transfer paper correctly into the paper tray as per the instructions on your Paper pack so that it prints out on the correct side.
I used this paper below which I bought on eBay for approx £7 for 20 sheets.

3. Cut around Image
So, print out your image on the Transfer paper, then let it dry as per instructions, then cut around the image.

I have found it best to cut as close as possible to the design otherwise you can see a faint mark where the blank paper has been ironed on. This is more obvious on pure white cotton (see below) but was less noticeable on natural coloured fabric. I have yet to do a test wash to see if this goes on washing.

4. Iron Image onto Fabric
Next, set your iron to its hottest setting - from this stage on, follow the instructions for your paper in case they differ from mine!

Place a large cutting board on your worktop or table to protect it, then lay a couple of tea towels or a folded pillowcase over it. An ironing board will not provide a hard enough surface.

Following the packet instructions, position your image ink side down and checked paper uppermost. Press carefully with the hot iron according to the time on the instructions - mine said for about 1 minute, making sure you press over all the edges and the whole area.

5. Peel off backing paper
Allow image to cool. This is most important, as one image I did I was too impatient and peeled it back too soon and it left a rough area and nearly spoilt the design.
Peel back the top paper layer smoothly and all in one go - this is also important I found - as I was pausing to take these action shots, when i re-started peeling back the paper I noticed it left lines in the print where I had paused.

Ta da!!!!! C'est tout!!!
Then make fabric up into what ever takes your fancy - me? I made cushions of course!
Oh, and a book cover, already featured in an earlier post here! This beautiful image was from Vintage Feedsacks .


I tried various fabrics - an antique linen sheet, osnaburg, and for the cushion I made up and showed in my last post, I used some cheap, loosely woven 100% cotton fabric cut from a decorating cloth.

The transfer paper I used creates images washable at 40 degrees (turn inside out) but they must be protected when ironed by non stick baking paper, peeled off whilst still warm.
Well, thats it! Simples!!!
Hope it made some sense, if you have any questions or queries please shout out!


above and below printed on osnaburg, a natural 100% cotton - it worked beautifully on this and the unprinted part of the transfer was scarcely noticeable.


Thanks for posting that - it looks very thorough, so even a clot like me ought to be able to do it with your instructions! I have never used this method and your results look great, so I may just have to buy some transfer paper and have a go. So many projects, so little time!
ReplyDeletex
Ooh thank you so much for sharing this Gill! Will definitely be giving it a go!
ReplyDeleteVictoria xx
This is an amazing tutorial. Thank you so much for taking the time to show us your technique. The photos and instructions were very clear.
ReplyDeleteAnne xx
hanks for this, it is something I have been meaning to try for a while but wasn't too sure about how it would turn out. Seeing your lovely results has given me a push in the right direction. Linda xxx
ReplyDeleteGreat post Gill and really well explained too! :)
ReplyDeleteThe images look so good, thanks for sharing!
Vivienne x
What a fantastic tutorial! I've just stumbled across you via Madelief and I'm absolutely delighted! I've always wondered where other bloggers got the fabric for this style of cushion (having assumed that the image was already on the grain sack - doh!) - and now I know - who knew that it could be so simple!
ReplyDeleteThank you so much - and btw you have a VERY lovely blog!
Paula xxx
Great job, thanks for the tutorial your projects turned out wonderful :)
ReplyDeleteBee happy x
Have a delicious day!
Fascinating, you've explained the process so well.
ReplyDeleteWhat a wonderful tutorial - can't wait to try!!
ReplyDeleteLove your tutorial, Gill! Thank you for sharing. Now I MUST to make it :o)
ReplyDeleteHave a lovely day
Love
Natasha
Oh my goodness, this is so fantastic! I'm in love. Well done. :)
ReplyDeleteThank you for this fabulous tutorial, Gill! I do love those french graphics and your cushions are really wonderful!!
ReplyDeleteHave a lovely weekend.
Helen x
Fantastic tutorial Gill...the poosibilities are endless, aren't they!! Love what you've created...what will they think of next?! And good for you for giving it a go!!!
ReplyDeletexoxo J~
Hi Gill,
ReplyDeleteThanks for stopping by my blog. I am following yours now. Can't wait to try your fabric printing.
Beth x
This is beyond fantastic!! Thank you so much for your wonderful tutorial. Guess what's on my shopping list next time at the stationery store!!!
ReplyDeleteHave a fab weekend hon.
Leah
x
Wow, this is brilliant. Oh the possibilities! Thanks for sharing, I have just discovered your blog for the first time and am a new follower. Love Katie xxx
ReplyDeleteHi Gill!
ReplyDeleteMerci beaucoup de votre bonne idee!:O)
With LOVE from Moscow!!!!!!!!!
xxx maria xxx
Awesome - am gonna re-read all this with a cuppa later so I get it all in my head, cos I deffo want to try it! Stunning effects. xCathy
ReplyDeleteYou gave us such wonderful step by step instructions. I am not the least bit crafty , but with your directions I think I would be able to achieve some decent results. I love this!
ReplyDeleteHello Gill,
ReplyDeletejust a quickie to let you know my first giveaway is on the go and its open to everyone. Pop in when you can,I'd hate you to miss it!!!
Keep well
Amanda :-)
Hi Gill, wonderful tutorial! I want to try it! I love your project! Great job!
ReplyDeleteWhat a lovely and informative blog you have. I love it and as soon as I'm done typing this comment . . . I'm going to hit the follow button. I found you through mutual followers . . we have some of the same delightful followers in our little circle of blogging sisters. I hope you will join me, too. Have a marvelous day . . . Delightful blog!!! Connie :)
ReplyDeleteHello, I was delighted when I opened my blog this morning and your lovely face was looking at me from my list of followers. Welcome! You blog is is wonderful and I am so excited to have found you. Have a grand day! Connie :)
ReplyDeleteMe encanta tu estilo. Es fantastico!!!!
ReplyDeleteAnna
Great tutorial about printing on Fabric using Inkjet Transfer Paper .Thanks to share a great information.paper printing
ReplyDeleteWow!Cool...it enlighten me about this kind of art..hahah..now I have an idea on how to do my artwork at my house.
ReplyDeleteHello, just found your blog! Lovely tutorial thank you. I've had some of this transfer stuff for ages and now I've no excuse! Barbara
ReplyDelete
ReplyDeleteNice blog. I understood the concept very well.
Banner Print
Exterior Printing
I read your post and I found it amazing! thank! cartes de visite
ReplyDelete